Sign in with Slack links using Auth0
Sign in with Slack links is a paid feature. Interested parties should fill out the interest form or reach out to partnersupport@slack-corp.com for more information.
Sign in with Slack (SIWS) links allow a user to share their Slack identity with your app when they click on a link from your service. When a user clicks on your link, Slack will utilize the OpenID Connect (OIDC) standard to send over a user’s identity information.
Prerequisites
- You have a Slack app using granular permissions.
- You have implemented Sign in with Slack using OpenID Connect.
- You are able to implement automatic provisioning and account linking within your product.
Domain Verification
In order to receive a user’s information when a link is clicked, you will first need to verify that you own your domain(s). This domain must be different from your production domain.
-
Reach out to partnersupport@slack-corp.com to request that Domain Verification be enabled for your team.
-
Navigate to your app's "Domain Verification" page. Go to your app settings page - you'll find "Domain Verification" under Settings in the left sidebar.
-
Click "Add Domain". Follow the prompts and enter the domain.
-
Reach out to partnersupport@slack-corp.com to confirm your domains.
Set up OpenID
You will need to implement Sign in with Slack for your service using OpenID Connect.
-
Choose an existing OpenID Connect Relying Party client for your tech stack (or create your own by following the standard) and point it towards Slack’s provided OpenID configuration URL. For this guide, we are using Auth0 as our client, but you can use whichever you’d like.
-
Navigate to your app settings
Oauth and Permissionspage. Add a redirect URL where you would like the OpenID flow to redirect after it’s completed, then click Save.For an Auth0 service, this may look like:
https://slacktest.us.auth0.com/login/callback -
Add the following User Token scopes:
-
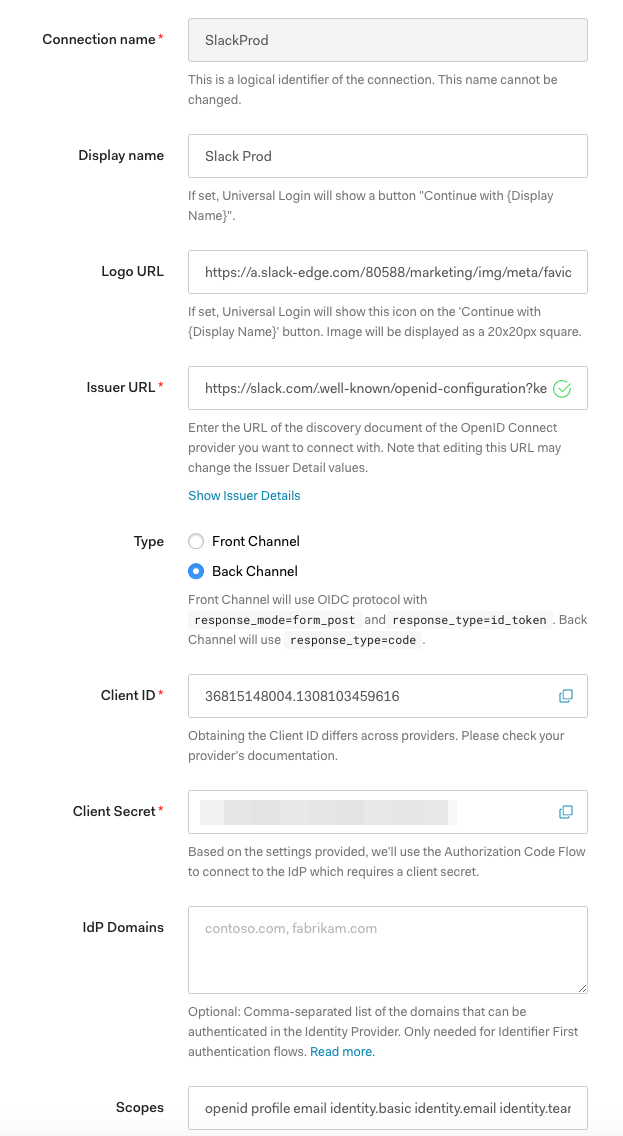
Navigate to your OpenID connect Relying Party client (Auth0 for us), navigate to Enterprise and then Connections. Click on OpenID Connect to create a new connection.
-
For Logo URL, you can use this sample URL:
https://a.slack-edge.com/80588/marketing/img/meta/favicon-32.png -
For Issuer URL, use this URL:
https://slack.com/.well-known/openid-configuration
-
-
We support both Front Channel and Back Channel types.
We have noticed that using the Front Channel method means that cookies are not sent by default in Chrome once the
form_postactually posts due to the SameSite restriction. If this means nothing to you, feel free to ignore!If you use Back Channel, enter your Client Secret as well. The Client Secret can be found on the "Basic Information" page in App Management.
Click Issuer Details and check whether or not the Token Endpoint is filled in. If it is not filled in, please enter:
https://slack.com/api/openid.connect.token. This endpoint is subject to change but we'll alert you if it is changed. -
Under Scopes, you should see
openid profile email. Add the identity scopes from your Slack App scopes:openid profile email identity.basic identity.email identity.team identity.avatar -
Click Save Changes.
For reference, here an example of a filled out Auth0 Configuration page:
From the OpenID Connect page, click the Try button to give it a try!
Implement automatic account provisioning and linking
When a link that conforms to the domain pattern (e.g. https://your-service.net/work-object/1) is first clicked in Slack, Slack will prompt the user to transfer their Slack identity to you.
The prompt will look something like this:

If a user clicks Accept, Slack will redirect the user to an endpoint with a login hint to start the identity transfer.
If the user clicks Decline, we will redirect to the link clicked. If a user declines three times, they will no longer see the prompt.
Below is what this process looks like:
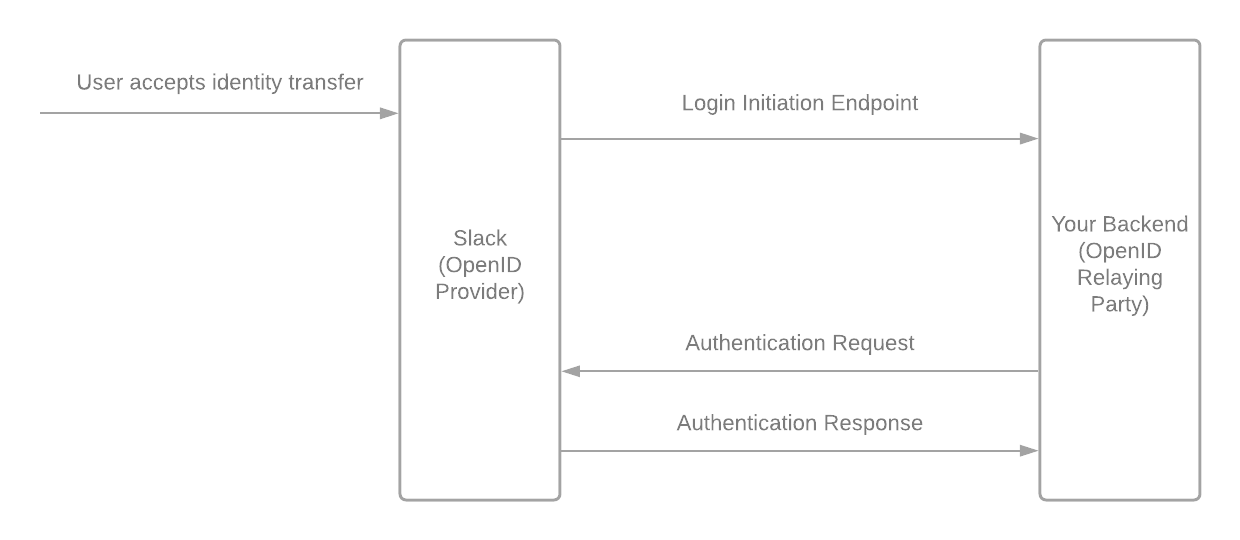
Slack will redirect to a login initiation endpoint that you have specified in your App Configuration Pages with the following parameters:
| Name | Value | Notes |
|---|---|---|
iss |
https://slack.com |
|
login_hint |
JWT-encoded target user information | Option to JWT decode this and check if the target user is already logged-in, bypassing the OpenID connect flow |
The OpenID Connect specification for initiating Login from a Third Party specifies how this endpoint is used. After receiving the request, your app will start an OpenID Connect authentication similar to the Sign in with Slack flow described above but with the login_hint parameter appended to the authorization URL.
When the flow is complete, there should be an additional key set with the claims called https://slack.com/target_uri. This is the URI the user originally clicked.
Sample workflow
-
Your app sends an Authentication Request to a Slack endpoint (e.g. https://slack.com/openid/connect/authorize):
GET /siws/authorize? response_type=id_token &client_id=6371490080.1055357699042 &redirect_uri=https%3A%2F%2Fid.test.net%2Fsiws%2Fauth &scope=openid%20email%20profile &login_hint=T5J4Q04QG-W1H5Z2EHE-bjzess81jq7ehbvq6ewta90pllihsqor &response_mode=form_post &state=af0ifjsldkj &nonce=n-0S6_WzA2Mj HTTP/1.1 Host: slack.com -
Slack verifies the request but will not conduct End-User Consent authorization, it will proceed without prompting the user. If the
login_hintdoes not match an existing stored link click, the Authentication Request will fail. -
Slack sends an Authentication Response to your app by sending a POST request to your response endpoint (e.g.
https://id.test.net/siws/auth) with the following parameters:
| Name | Value |
|---|---|
id_token |
JWT-encoded payload |
expires_in |
300 |
state |
State sent in Authentication Request |
-
After decoding, the JWT-encoded payload will include the following:
{ "iss": "https://slack.com", "sub": "jsmith@slack-corp.com", "aud": "6371490080.1055357699042", "exp": 1592939535, "iat": 1592939235, "auth_time": 1592939235, "nonce": "n-0S6_WzA2Mj", "email": "bfan@slack-corp.com", "locale": "en-US", "name": "John Smith", "given_name": "John", "family_name": "Smith", "picture": "https://s3-us-west-2.amazonaws.com/slack-files-dev2/avatars/...", "https://slack.com/user_id": "U123ABC456", "https://slack.com/user_image_24": "https://s3-us-west-2.amazonaws.com/...", "https://slack.com/user_image_32": "https://s3-us-west-2.amazonaws.com/...", "https://slack.com/user_image_48": "https://s3-us-west-2.amazonaws.com/...", "https://slack.com/user_image_72": "https://s3-us-west-2.amazonaws.com/...", "https://slack.com/user_image_192": "https://s3-us-west-2.amazonaws.com/...", "https://slack.com/user_image_512": "https://s3-us-west-2.amazonaws.com/...", "https://slack.com/user_image_1024": "https://s3-us-west-2.amazonaws.com/...", "https://slack.com/team_id": "T0123ABC456", "https://slack.com/team_name": "John Testy", "https://slack.com/team_domain": "johntesty", "https://slack.com/team_image_34": "https://slack.com/dev-cdn/v1587409668/...", "https://slack.com/team_image_44": "https://slack.com/dev-cdn/v1587409668/...", "https://slack.com/team_image_68": "https://slack.com/dev-cdn/v1587409668/...", "https://slack.com/team_image_default": true, "https://slack.com/target_uri": "https://johnjiratest.test.net/browse/PLAT-1" } -
You MUST verify that the
noncematches the one originally sent. It should also verify the JWT using the JWKS defined by Slack and verify that the JWT has not expired. -
You can now check if an account with this email already exists. If it does not, you can automatically provision an account for the user. If it does, it will add Sign in with Slack as an additional login method for the account.